Cloudflare Worker
Prerequisites
- You are using Cloudflare for DNS, and you have proxying enabled
- You have sufficient permissions on Cloudflare to create workers and configure worker routes for your website
- The Satellite has been successfully set up and is reachable (via HTTPS) from the worker
Deploying the Worker
Using the CLI
Follow the steps below to deploy the Worker to your account.
You can obtain your Organization ID from the settings page or by clicking on your profile picture in Levo's dashboard and navigating to User Settings -> Organizations.
# Clone the worker repository
git clone https://github.com/levoai/cf-worker.git
# cd into the repository
cd cf-worker
# Install all dependencies
yarn
# Authenticate with Cloudflare
npx wrangler login
# Deploy the worker
npx wrangler deploy
# Add your organization ID as a secret
echo <VALUE> | npx wrangler secret put LEVO_ORG_ID
The Worker has now been added to your Cloudflare account.
You must also add LEVO_SATELLITE_URL as an environment variable for the Worker if you are hosting the Satellite yourself.
Check the repository's README for a list of all supported variables.
Note: Wrangler requires Node.js v16+.
Check your version with node -v, Upgrade using NodeSource or nvm if needed to avoid installation and runtime issues.
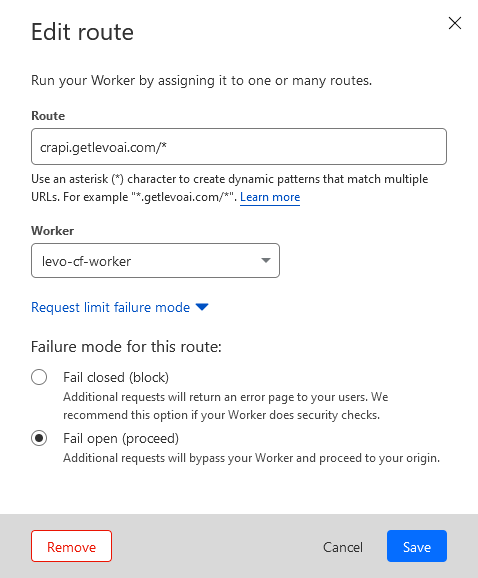
Configure Websites to Use the Worker
Follow the instructions in the Cloudflare Docs.
When adding a Worker route, ensure that the failure mode is set to "Fail open" to allow requests to bypass the Worker in case of unexpected errors or if the daily request limit runs out.
Troubleshoot Wrangler Login
If you encounter an error while running npx wrangler login, make sure you have the latest version of Node.js installed.
- Running the above command should open a browser window where you can log in to your Cloudflare account
- Once you have logged in successfully, you should be prompted with a consent form to allow Wrangler to access your Cloudflare account.

- After you click on
Allow, you will be redirected to a page with a success message.

- Now you can close the browser window and return to your terminal where you should see a success message.
Support
For further assistance, please reach out to support@levo.ai.